For financial services organizations, there are many unique security, regulatory, and compliance obligations institutions face on a daily basis. This is especially relevant when it comes to their VPN strategy. Historically, providing employees with VPN access into secure environments within AWS has required the use of third party solutions that need to be built and managed. With AWS’s VPN solution, AWS provides these capabilities as a service. With AWS VPN, companies can implement a solution that provides remote access to their AWS accounts while still being able to enforce security, traceability, and auditability requirements.
Some of the business benefits that can be gained from using a combination of AWS Client VPN and Transit Gateway:
- Allows a business and its employees to work from anywhere and be able to access their required AWS resources with multiple OpenVPN compatible software appliances
- Reduces the overhead and cost of managing VPN access for many AWS accounts by utilizing a centralized AWS account that acts as the VPN network hub for an organization. AWS Client VPN is an AWS managed service that scales accordingly to meet VPN access load.
- Provides a secure VPN connection with compatibility of employee authentication through existing Active Directory or other authentication protocols.
- Provides flexibility to integrate this type of solution with connection to on-premise resources.
In this blog post, we’ll go over using a combination of AWS Client VPN and AWS Transit Gateway to create a centralized network hub account VPC that acts as a router for VPN communication to many VPCs across an AWS Organization. By the end of this post, you will learn how you can create a centralized hub-and-spoke VPN network strategy, that can scale with your organization, providing your employees with remote VPN access from anywhere in a secure fashion.
Solution
With the given scenario above, let’s look at how we can solve this with a combination of AWS services and AWS Client VPN to provide an automated solution for configuring a centralized remote VPN network within AWS.
| Problem | Solution | AWS Services |
|---|---|---|
| Remote VPN access into AWS | Creating an AWS Client VPN Endpoint to serve as the endpoint for remote clients to connect to and gain VPN access into AWS | AWS Client VPN |
| Authentication for remote VPN clients | Integrating AWS Simple Active Directory as the mechanism for authenticating against the Client VPN Endpoint. | AWS Simple Active Directory |
| Overhead of maintaining VPN access | Establishing a dedicated network hub account and VPC to act as the centralized point of remote client VPN access. This centralized network hub account is where remote clients can connect to and communicate with other VPCs using AWS Transit Gateway as the routing mechanism. | AWS VPC, AWS Transit Gateway |
| Segregation of user access into specific networks | With combining AWS Simple Active Directory and AWS Client VPN, you are able to authorize different users/groups to specific VPC networks that are attached to the centralized network hub VPC Transit Gateway. | AWS Client VPN Authorization Rules, AWS Simple Active Directory |
| Manual configuration of VPN access to other VPCs | Implementing a solution of using a combination of AWS Service Catalog and AWS CloudFormation to provide automation for configuring remote VPN access to other VPCs | AWS Service Catalog, AWS CloudFormation |
NOTE: The exercises throughout this blog post can only be completed in either the “us-east-1” or “us-west-2” AWS Regions due to limitations with AWS SimpleAD.
Setup
Here we will create an AWS Cloud9 Environment for you to execute the activities described within this blog post:
- Go to the AWS Cloud9 console and select Create Environment
- Enter a Name and Description
- Select Next Step
- Select Create a new instance for the environment (EC2)
- Select t2.micro
- Leave the Cost-saving setting at the After 30-minute (default) option enabled
- Select Next Step
- Review best practices and select Create Environment
- Once your Cloud environment has been launched, open a new terminal in Cloud9
Clone the Repository
From your Cloud9 terminal, run the following commands:
git clone https://github.com/VerticalRelevance/aws-client-vpn-factory.gitcd aws-client-vpn-factory
Creating a Server Certificate for AWS ACM
We will need to create a server certificate and upload it to the AWS Certificate Manager. This certificate will be used for the Client VPN Endpoint and is a requirement when creating a Client VPN Endpoint.
From your Cloud9 terminal, run the following commands:
export REGION=<your_aws_region>./create_and_import_acm_cert.sh- At the terminal prompt where it states “Common Name (eg: your user, host, or server name) [Easy-RSA CA]:” just hit “Enter” to continue
#!/bin/bash

if [ -z $REGION ];
  then echo "ERROR: Please set 'REGION' to your current AWS Region!" && exit 1;
fi
ROOT_DIR=`pwd`

git clone https://github.com/OpenVPN/easy-rsa.git
cd easy-rsa/easyrsa3
./easyrsa init-pki
./easyrsa build-ca nopass
./easyrsa build-server-full clientvpn-ad-test nopass
mkdir custom_folder/
cp pki/ca.crt custom_folder/
cp pki/issued/clientvpn-ad-test.crt custom_folder/
cp pki/private/clientvpn-ad-test.key custom_folder/
cd custom_folder/

# Import server cert to ACM
aws acm import-certificate \
  --certificate fileb://clientvpn-ad-test.crt \
  --private-key fileb://clientvpn-ad-test.key \
  --certificate-chain fileb://ca.crt \
  --tags Key=Name,Value=clientvpn-ad-test \
  --region $REGION
cd $ROOT_DIR
rm -rf easy-rsa
This will import a server certificate with a domain name of “clientvpn-ad-test” up to AWS ACM.
Install OpenVPN Tool
For the exercises in this blog post, I will be using Tunnelblick OpenVPN client to test VPN connectivity later on. You can, however, use your choice of OpenVPN compatible tool to test out the VPN connectivity. You can find the downloads page for Tunnelblick here
Note: The installation of the Tunnelblick client is meant to be done on your own local workstation as you will use this later on to test out the Client VPN connectivity we’re building.
Remote VPN Scaling – Multi-Account Strategy
For this blog post, we will use a single AWS account to reduce the complexity, but we recommend investing in building a multi-account remote VPN solution that can scale with your business. Below is a sample architecture that depicts the types of possibilities that can be achieved through an automated multi-account remote VPN strategy.
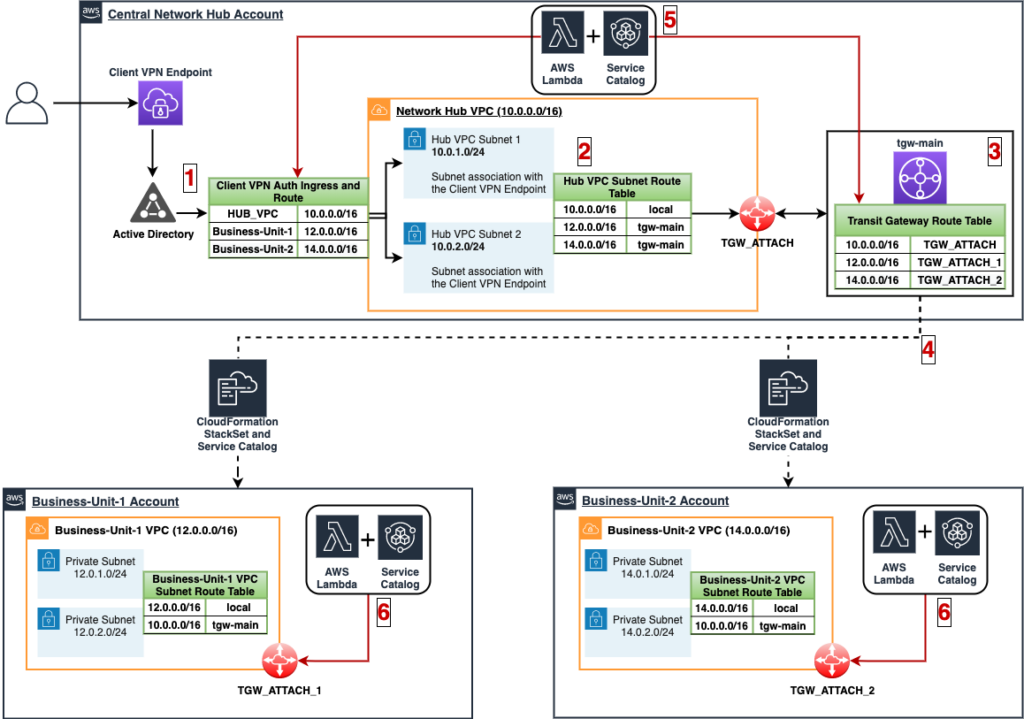
The networking would be configured through the use of hub and spoke VPCs. This is done through:
- An AWS Client VPN is provisioned in a Central Network Account and is associated with a centralized hub VPC. The AWS Client VPN is integrated with Active Directory which enables the organization to use an existing Active Directory as the authentication mechanism for employees to gain remote access to the AWS Client VPN. The AWS Client VPN can be configured to only allow access to specific networks based on Active Directory users and/or groups. This allows an organization to maintain secure and segregated network access based on existing identity structure.
- A centralized hub VPC is deployed in the Central Network Account that acts as a router for remote client VPN traffic to other VPCs across the AWS Organization.
- An AWS Transit Gateway is provisioned in the Central Network Account that is attached to the centralized hub VPC. This Transit Gateway is where remote client VPN traffic will flow to and from the centralized hub VPC and other VPCs across the organization. The Transit Gateway resource can also be shared with other member accounts within the AWS Organization so that VPCs within those accounts have access to it.
- An AWS Service Catalog Product for Transit Gateway Attachment and a Lambda Function are shared/deployed to other accounts via CloudFormation StackSets
- An AWS Service Catalog Products for Client VPN Authorization Ingress and Route Configuration are provisioned automatically with the use of Lambda Functions. This provides an automated mechanism for configuring the centralized AWS Client VPN hub VPC to connect to new/existing VPCs within the AWS Organization.
- An AWS Service Catalog Product for Transit Gateway Attachments are provisioned automatically for specific VPCs in other accounts based on Tag look-ups or other identifying metadata.
With a multi-account strategy, you can also take advantage of the AWS Transit Gateway network manager to provide global visibility of your network resources.
Centralized Hub VPN VPC
In this section, we will deploy the CodePipeline that creates:
- The main centralized hub VPC with SimpleAD named “Main Network Hub Client VPN VPC”
- Client VPN Endpoint associated with the hub VPC named “AWS Client VPN authentication with AWS Simple AD”
- Transit Gateway attached to the hub VPC named “Central network hub TGW”
- Two private subnets and the Route Table associated with them (also associated with the Client VPN) named “Main Network Hub VPC Client VPN Subnet Route Table”
With the use of predefined Python scripts utilizing the AWS Python SDK, this pipeline will launch the following CloudFormation templates located within the repo:
cfn_templates/network_account_main_vpc_with_simple_ad.yml
AWSTemplateFormatVersion: '2010-09-09'
Parameters:
  Organization:
    Type: String
    Default: Vertical Relevance
  DomainName:
    Description: FQDN of the domain for this directory
    Type: String
    Default: clientvpnad.verticalrelevance.com
  SimpleADShortName:
    Description: Netbios name of the domain for this directory
    Type: String
    Default: clientvpnad
  SimpleADPW:
    Description: Domain admin Password
    Type: String
    NoEcho: true
    Default: Password123!
  Size:
    Description: Size of the Simple AD
    Type: String
    AllowedValues:
      - Small
      - Large
    Default: Small
  VpnVpcCidr:
    Description: CIDR Block of central hub VPN VPC
    Type: String
    Default: '12.0.0.0/16'
    ConstraintDescription: CIDR block parameter must be in the form x.x.x.x/16-28
    AllowedPattern: "^(([0-9]|[1-9][0-9]|1[0-9]{2}|2[0-4][0-9]|25[0-5])\\.){3}([0-9]|[1-9][0-9]|1[0-9]{2}|2[0-4][0-9]|25[0-5])(\\/(1[6-9]|2[0-8]))$"
  PrivateVpnRouterSubnet1:
    Description: Private Subnet to be used as target network Subnet for Client VPN
    Type: String
    Default: '12.0.1.0/24'
    ConstraintDescription: CIDR block parameter must be in the form x.x.x.x/16-28
    AllowedPattern: "^(([0-9]|[1-9][0-9]|1[0-9]{2}|2[0-4][0-9]|25[0-5])\\.){3}([0-9]|[1-9][0-9]|1[0-9]{2}|2[0-4][0-9]|25[0-5])(\\/(1[6-9]|2[0-8]))$"
  PrivateVpnRouterSubnet2:
    Description: Private Subnet to be used as target network Subnet for Client VPN
    Type: String
    Default: '12.0.2.0/24'
    ConstraintDescription: CIDR block parameter must be in the form x.x.x.x/16-28
    AllowedPattern: "^(([0-9]|[1-9][0-9]|1[0-9]{2}|2[0-4][0-9]|25[0-5])\\.){3}([0-9]|[1-9][0-9]|1[0-9]{2}|2[0-4][0-9]|25[0-5])(\\/(1[6-9]|2[0-8]))$"
  NatGatewayVpnRouterSubnet:
    Description: Private Subnet to be used as target network Subnet for Client VPN
    Type: String
    Default: '12.0.3.0/24'
    ConstraintDescription: CIDR block parameter must be in the form x.x.x.x/16-28
    AllowedPattern: "^(([0-9]|[1-9][0-9]|1[0-9]{2}|2[0-4][0-9]|25[0-5])\\.){3}([0-9]|[1-9][0-9]|1[0-9]{2}|2[0-4][0-9]|25[0-5])(\\/(1[6-9]|2[0-8]))$"
  BusinessUnit:
    Description: AWS Organizational Unit
    Type: String
    Default: Developer
Resources:
    VPC:
        Type: AWS::EC2::VPC
        Properties:
            EnableDnsSupport: true
            EnableDnsHostnames: true
            CidrBlock: !Ref VpnVpcCidr
            Tags:
              - Key: Name
                Value: !Sub 'Main Network Hub Client VPN VPC'

    SubnetOne:
        Type: AWS::EC2::Subnet
        Properties:
            AvailabilityZone:
                Fn::Select:
                - 0
                - Fn::GetAZs: {Ref: 'AWS::Region'}
            VpcId: !Ref 'VPC'
            CidrBlock: !Ref PrivateVpnRouterSubnet1
            Tags:
              - Key: Name
                Value: !Sub 'Main Network Hub Client VPN VPC Private Subnet 1'

    SubnetTwo:
        Type: AWS::EC2::Subnet
        Properties:
            AvailabilityZone:
                Fn::Select:
                - 1
                - Fn::GetAZs: {Ref: 'AWS::Region'}
            VpcId: !Ref 'VPC'
            CidrBlock: !Ref PrivateVpnRouterSubnet2
            Tags:
              - Key: Name
                Value: !Sub 'Main Network Hub Client VPN VPC Private Subnet 2'

    InternetGateway:
        Type: AWS::EC2::InternetGateway

    GatewayAttachement:
        Type: AWS::EC2::VPCGatewayAttachment
        Properties:
            VpcId: !Ref 'VPC'
            InternetGatewayId: !Ref 'InternetGateway'

    RouteTable:
        Type: AWS::EC2::RouteTable
        Properties:
            VpcId: !Ref 'VPC'
            Tags:
              - Key: Name
                Value: Main Network Hub VPC Client VPN Subnet Route Table

    SubnetOneRouteTableAssociation:
        Type: AWS::EC2::SubnetRouteTableAssociation
        Properties:
            SubnetId: !Ref SubnetOne
            RouteTableId: !Ref RouteTable

    SubnetTwoRouteTableAssociation:
        Type: AWS::EC2::SubnetRouteTableAssociation
        Properties:
            SubnetId: !Ref SubnetTwo
            RouteTableId: !Ref RouteTable

    NatSubnetRouteTableAssociation:
      Type: AWS::EC2::SubnetRouteTableAssociation
      Properties:
        SubnetId: !Ref NatGatewaySubnet
        RouteTableId: !Ref NatGatewayRouteTable

    # Nat Gateway Config
    NatGatewaySubnet:
      Type: AWS::EC2::Subnet
      Properties:
        AvailabilityZone:
          Fn::Select:
            - 1
            - Fn::GetAZs: {Ref: 'AWS::Region'}
        VpcId: !Ref 'VPC'
        CidrBlock: !Ref NatGatewayVpnRouterSubnet
        Tags:
          - Key: Name
            Value: !Sub 'Main Network Hub Client VPN VPC NAT Gateway Subnet'

    NatGateway:
      Type: AWS::EC2::NatGateway
      Properties:
        AllocationId: !GetAtt NatGatewayEIP.AllocationId
        SubnetId: !Ref NatGatewaySubnet
        Tags:
          - Key: Organization
            Value: !Ref Organization

    NatGatewayEIP:
      Type: AWS::EC2::EIP
      Properties:
        Domain: vpc

    NatGatewayRouteTable:
      Type: AWS::EC2::RouteTable
      Properties:
        VpcId: !Ref 'VPC'

    NatGatewayRoute:
      Type: AWS::EC2::Route
      DependsOn: GatewayAttachement
      Properties:
        RouteTableId: !Ref 'NatGatewayRouteTable'
        DestinationCidrBlock: '0.0.0.0/0'
        GatewayId: !Ref 'InternetGateway'

    PrivateSubnetNatGatewayRoute:
      Type: AWS::EC2::Route
      DependsOn: GatewayAttachement
      Properties:
        RouteTableId: !Ref 'RouteTable'
        DestinationCidrBlock: '0.0.0.0/0'
        NatGatewayId: !Ref 'NatGateway'

# Simple AD Setup
    SimpleAD:
        Type: 'AWS::DirectoryService::SimpleAD'
        Properties:
            CreateAlias: false
            EnableSso: false
            Name: !Ref DomainName
            Password: !Ref SimpleADPW
            ShortName: !Ref SimpleADShortName
            Size: !Ref Size
            VpcSettings:
                SubnetIds:
                - !Ref SubnetOne
                - !Ref SubnetTwo
                VpcId: !Ref VPC

# Transit Gateway
    TransitGateway:
      Type: AWS::EC2::TransitGateway
      Properties:
        AutoAcceptSharedAttachments: enable
        DefaultRouteTableAssociation: enable
        DefaultRouteTablePropagation: enable
        Description: Central network hub TGW for VPN forwarding
        DnsSupport: enable
        Tags:
          - Key: Name
            Value: Central network hub TGW
        VpnEcmpSupport: enable

    TransitGatewayAttachment:
      Type: AWS::EC2::TransitGatewayAttachment
      Properties:
        SubnetIds:
          - !Ref SubnetOne
          - !Ref SubnetTwo
        Tags:
          - Key: Name
            Value: Central network hub TGW Attachment
        TransitGatewayId: !Ref TransitGateway
        VpcId: !Ref VPC

Outputs:
  VpcCidr:
    Description: ClientVpnTargetNetworkVpcCidr
    Value: !Ref VpnVpcCidr
  RouteTableId:
    Description: RouteTableId
    Value: !Ref RouteTable
  TransitGatewayId:
    Description: TransitGatewayId
    Value: !Ref TransitGateway
  BusinessUnit:
    Description: AWS Organizational Unit
    Value: !Ref BusinessUnit
  VpcID:
    Description: ID of VPC
    Value: !Ref VPC
  SubnetOneID:
    Description: ID of SubnetOne
    Value: !Ref SubnetOne
  SubnetTwoID:
    Description: ID of SubnetTwo
    Value: !Ref SubnetTwo
  DirectoryID:
    Description: ID of the SimpleAD
    Value: !Ref SimpleAD
  PrimaryDNS:
    Description: DNS IPs of the SimpleAD
    Value: !Select
      - '0'
      - !GetAtt
        - SimpleAD
        - DnsIpAddresses
  SecondaryDNS:
    Description: DNS IPs of the SimpleAD
    Value: !Select
      - '1'
      - !GetAtt
        - SimpleAD
        - DnsIpAddresses
cfn_templates/client_vpn_endpoint.yml
AWSTemplateFormatVersion: '2010-09-09'
Parameters:
  VpnClientCidrRange:
    Type: String
    Description: CIDR Range for VPN Clients
    Default: '10.0.0.0/16'
  ServerCertificateArn:
    Type: String
    Description: ACM Server Certificate ARN used for Client VPN
  ClientVpnTargetNetworkVpcCidr:
    Type: String
    Description: Network account central VPC CIDR to be used as initial authorized route for Client VPN connection
  ClientVpnTargetNetworkVpc:
    Type: String
    Description: Network account central VPC ID for Client VPN connection association
  ClientVpnTargetNetworkSubnet1:
    Type: String
    Description: Network account central VPC Subnet ID for Client VPN connection association
  ClientVpnTargetNetworkSubnet2:
    Type: String
    Description: Network account central VPC Subnet ID for Client VPN connection association
  ActiveDirectoryId:
    Description: Active Directory ID for Client VPN Auth
    Type: String
  ActiveDirectoryDnsServer1:
    Description: Active Directory DNS Server 1
    Type: String
  ActiveDirectoryDnsServer2:
    Description: Active Directory DNS Server 2
    Type: String
  BusinessUnit:
    Description: AWS Organizational Unit
    Type: String
    Default: Business-Unit-1
  AuthorizeAllUsers:
    Description: Authorize all users in Active Directory for Client VPN Authorization Rule
    Type: String
    Default: true
  AccessGroupId:
    Description: Access Group ID in Active Directory for Client VPN Authorization Rule
    Type: String
    Default: ''
Conditions:
  AuthorizeAllUsersForVpnAuthRule: !And
    - !Equals [ !Ref AuthorizeAllUsers, true ]
    - !Equals [ !Ref AccessGroupId, '' ]

  AllowOnlyAccessGroupForVpnAuthRule: !And
    - !Equals [ !Ref AuthorizeAllUsers, false ]
    - !Not [!Equals [!Ref AccessGroupId, '']]
Resources:
    ClientVpnCloudWatchLogGroup:
      Type: AWS::Logs::LogGroup
      Properties:
        LogGroupName: 'clientvpn-with-ad-log'

    ClientVpnTargetNetworkAssociation:
      Type: AWS::EC2::ClientVpnTargetNetworkAssociation
      Properties:
        ClientVpnEndpointId: !Ref ClientVpnEndpoint
        SubnetId: !Ref ClientVpnTargetNetworkSubnet1
    ClientVpnTargetNetworkAssociation2:
      Type: AWS::EC2::ClientVpnTargetNetworkAssociation
      Properties:
        ClientVpnEndpointId: !Ref ClientVpnEndpoint
        SubnetId: !Ref ClientVpnTargetNetworkSubnet2

    ClientVpnEndpoint:
      DependsOn: ClientVpnCloudWatchLogGroup
      Type: AWS::EC2::ClientVpnEndpoint
      Properties:
        AuthenticationOptions:
          - ActiveDirectory:
              DirectoryId: !Ref ActiveDirectoryId
            Type: directory-service-authentication
        ClientCidrBlock: !Ref VpnClientCidrRange
        ConnectionLogOptions:
          CloudwatchLogGroup: !Ref ClientVpnCloudWatchLogGroup
          Enabled: true
        Description: AWS Client VPN authenticated with AWS Simple AD
        DnsServers:
          - !Ref ActiveDirectoryDnsServer1
          - !Ref ActiveDirectoryDnsServer2
        ServerCertificateArn: !Ref ServerCertificateArn
        TransportProtocol: tcp
        VpcId: !Ref ClientVpnTargetNetworkVpc
        VpnPort: 443
        TagSpecifications:
          - ResourceType: client-vpn-endpoint
            Tags:
              - Key: Name
                Value: AWS Client VPN authenticated with AWS Simple AD

    ClientVpnAuthorizationRule:
      DependsOn:
        - ClientVpnTargetNetworkAssociation
        - ClientVpnTargetNetworkAssociation2
      Type: AWS::EC2::ClientVpnAuthorizationRule
      Properties:
        AccessGroupId:
          !If [AllowOnlyAccessGroupForVpnAuthRule, !Ref AccessGroupId, !Ref "AWS::NoValue"]
        AuthorizeAllGroups:
          !If [AuthorizeAllUsersForVpnAuthRule, !Ref AuthorizeAllUsers, !Ref "AWS::NoValue"]
        ClientVpnEndpointId: !Ref ClientVpnEndpoint
        Description: Client VPN Authorization rule to allow usage of target network VPC as a route-forwarder to Transit Gateway
        TargetNetworkCidr: !Ref ClientVpnTargetNetworkVpcCidr

  # SSM Parameters
    ClientVpnEndpointSSM:
      Type: AWS::SSM::Parameter
      Properties:
        Description: !Sub 'Client VPN Endpoint for ${BusinessUnit}'
        Name: !Sub '/${BusinessUnit}/client-vpn-endpoint'
        Tier: Standard
        Type: String
        Value: !Ref ClientVpnEndpoint

Outputs:
  ClientVpnEndpoint:
    Description: ID of VPC
    Value: !Ref ClientVpnEndpoint
From your Cloud9 terminal, run the following commands:
export GITHUB_TOKEN=<your_github_token>./deploy_hub_vpc_pipeline.sh
Below is a diagram that depicts the infrastructure resources that have been created:

- User hits the Client VPN Endpoint with OpenVPN compatible client.
- User authenticates with AWS Active Directory credentials and is granted an authorized route ingress based on user/group in Active Directory to the CIDR of the Network Hub VPC (12.0.0.0/16)
- Traffic from a remote client is forwarded through the Network Hub VPC Subnets that are associated with the Client VPN Endpoint
- The Network Hub VPC is attached to the centralized Transit Gateway “tgw-main” with an attachment named “TGW_ATTACH_1”.
Service Catalog Pipeline
In this section, we will deploy a CodePipeline that creates the following resources:
- An S3 Bucket named which will serve as the bucket to store the associated Service Catalog templates.
- A Service Catalog Portfolio/Product that consists of a Transit Gateway Attachment and other network configuration – named “AWS Transit Gateway Attachment”
- A Service Catalog Portfolio/Product that consists of a Client VPN authorization ingress rule and associated route set up to allow VPN communication to a new VPC – named “AWS Client VPN Auth and Route Config”
Service Catalog Transit Gateway Attachment CloudFormation template (cfn_templates/service-catalog/tgw_attachment/tgw_attachment.yml):
AWSTemplateFormatVersion: '2010-09-09'
Parameters:
  CentralNetworkAccountVpnVpcCIDR:
    Description: VPC CIDR block of the central network VPN hub account VPC
    Type: String
  TgwAttachmentSubnet1:
    Type: String
    Description: Subnet ID to be associated with TGW attachment to VPC
  TgwAttachmentSubnet2:
    Type: String
    Description: Subnet ID to be associated with TGW attachment to VPC
  TransitGatewayId:
    Description: Transit Gateway ID of the central network VPN hub account TGW
    Type: String
  VpcId:
    Description: VPC Id that is getting attached to the central network VPN hub account TGW
    Type: String

# Conditional Parameters for Adding one or more routes to TGW
  RouteTableId1:
    Description: Subnet Route Table ID for TGW route to central network VPN hub account VPC CIDR - 1
    Type: String
    Default: ''
  RouteTableId2:
    Description: Subnet Route Table ID for TGW route to central network VPN hub account VPC CIDR - 2
    Type: String
    Default: ''
  RouteTableId3:
    Description: Subnet Route Table ID for TGW route to central network VPN hub account VPC CIDR - 3
    Type: String
    Default: ''

Conditions:
  CreateRouteForRouteTable1: !Not [!Equals [!Ref RouteTableId1, '']]
  CreateRouteForRouteTable2: !Not [!Equals [!Ref RouteTableId2, '']]
  CreateRouteForRouteTable3: !Not [!Equals [!Ref RouteTableId3, '']]

Resources:
  TransitGatewayAttachment:
    Type: AWS::EC2::TransitGatewayAttachment
    Properties:
      SubnetIds:
        - !Ref TgwAttachmentSubnet1
        - !Ref TgwAttachmentSubnet2
      Tags:
        - Key: Name
          Value: !Sub 'TGW Attachment for Test VPC to Main Network Hub VPC'
      TransitGatewayId: !Ref TransitGatewayId
      VpcId: !Ref VpcId

  TransitGatewayRoute1:
    DependsOn: TransitGatewayAttachment
    Condition: CreateRouteForRouteTable1
    Type: AWS::EC2::Route
    Properties:
      DestinationCidrBlock: !Ref CentralNetworkAccountVpnVpcCIDR
      RouteTableId: !Ref RouteTableId1
      TransitGatewayId: !Ref TransitGatewayId

  TransitGatewayRoute2:
    DependsOn: TransitGatewayAttachment
    Condition: CreateRouteForRouteTable2
    Type: AWS::EC2::Route
    Properties:
      DestinationCidrBlock: !Ref CentralNetworkAccountVpnVpcCIDR
      RouteTableId: !Ref RouteTableId2
      TransitGatewayId: !Ref TransitGatewayId

  TransitGatewayRoute3:
    DependsOn: TransitGatewayAttachment
    Condition: CreateRouteForRouteTable3
    Type: AWS::EC2::Route
    Properties:
      DestinationCidrBlock: !Ref CentralNetworkAccountVpnVpcCIDR
      RouteTableId: !Ref RouteTableId3
      TransitGatewayId: !Ref TransitGatewayId
Service Catalog Client VPN Route Setup CloudFormation template (cfn_templates/service-catalog/vpn/client_vpn_route_setup.yml):
AWSTemplateFormatVersion: '2010-09-09'
Parameters:
  NewVpcCIDR:
    Type: String
    Description: CIDR Range of the new VPC that is being added to the Client VPN connection via TGW
  ClientVpnEndpoint:
    Type: String
    Description: Client VPN Endpoint
  ClientVpnTargetNetworkSubnet1:
    Type: String
    Description: Client VPN Target Network Subnet 1
  ClientVpnTargetNetworkSubnet2:
    Type: String
    Description: Client VPN Target Network Subnet 2
  TransitGatewayId:
    Description: Transit Gateway ID of the central network VPN hub account TGW
    Type: String
  RouteTableId:
    Description: Subnet Route Table ID of Client VPN Associated Target Network Subnets
    Type: String
  AuthorizeAllUsers:
    Description: Authorize all users in Active Directory for Client VPN Authorization Rule
    Type: String
    Default: true
  AccessGroupId:
    Description: Access Group ID in Active Directory for Client VPN Authorization Rule
    Type: String
    Default: ''

Conditions:
  AuthorizeAllUsersForVpnAuthRule: !And
    - !Equals [ !Ref AuthorizeAllUsers, true ]
    - !Equals [ !Ref AccessGroupId, '' ]

  AllowOnlyAccessGroupForVpnAuthRule: !And
    - !Equals [ !Ref AuthorizeAllUsers, false ]
    - !Not [!Equals [!Ref AccessGroupId, '']]

Resources:
  ClientVpnAuthorizationRule:
    Type: AWS::EC2::ClientVpnAuthorizationRule
    Properties:
      AccessGroupId:
        !If [AllowOnlyAccessGroupForVpnAuthRule, !Ref AccessGroupId, !Ref "AWS::NoValue"]
      AuthorizeAllGroups:
        !If [AuthorizeAllUsersForVpnAuthRule, !Ref AuthorizeAllUsers, !Ref "AWS::NoValue"]
      ClientVpnEndpointId: !Ref ClientVpnEndpoint
      Description: !Sub 'Client VPN Authorization rule to allow clients to access VPC with CIDR ${NewVpcCIDR} through Transit Gateway'
      TargetNetworkCidr: !Ref NewVpcCIDR

  ClientVpnRouteToNewVpc1:
    Type: AWS::EC2::ClientVpnRoute
    Properties:
      ClientVpnEndpointId: !Ref ClientVpnEndpoint
      DestinationCidrBlock: !Ref NewVpcCIDR
      TargetVpcSubnetId: !Ref ClientVpnTargetNetworkSubnet1

  ClientVpnRouteToNewVpc2:
    Type: AWS::EC2::ClientVpnRoute
    Properties:
      ClientVpnEndpointId: !Ref ClientVpnEndpoint
      DestinationCidrBlock: !Ref NewVpcCIDR
      TargetVpcSubnetId: !Ref ClientVpnTargetNetworkSubnet2

  ClientVpnVpcTargetNetworkSubnetsRoute:
    Type: AWS::EC2::Route
    Properties:
      DestinationCidrBlock: !Ref NewVpcCIDR
      RouteTableId: !Ref RouteTableId
      TransitGatewayId: !Ref TransitGatewayId
From your Cloud9 terminal, run the following commands:
- If you would like to give your IAM user permission to launch the Service Catalog Products, then run
export LINKED_IAM_USER=<your_iam_user_name> - If you would like to give a specific IAM Role permission to launch the Service Catalog Products, then run
export LINKED_IAM_ROLE_ARN=<iam_role_arn>- You can set both
LINKED_IAM_USERandLINKED_IAM_ROLE_ARNif you would like to provide both with Service Catalog permissions.
- You can set both
export GITHUB_TOKEN=<your_github_token>export BUCKET_NAME=<unique_bucket_name_for_service_catalog>./deploy_service_catalog_pipeline.sh
Below is a diagram that depicts the pipeline and resources that have been created from the Service Catalog Pipeline:

- AWS CodePipeline used for automating the testing and creation of Service Catalog Portfolios and Products
- Service Catalog Product for the AWS Transit Gateway Attachment named “AWS Transit Gateway Attachment”
- Service Catalog Product for the AWS Client VPN Auth and Route Config named “AWS Client VPN Auth and Route Config”
After the pipeline has validated the Service Catalog templates, it will reach a manual approval gate before continuing to provision the products. Approve the gate and let the pipeline continue.
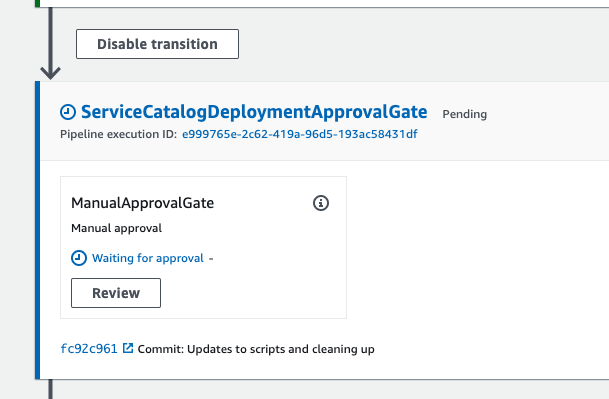
After successful completion of this pipeline, we can see that there are now two Service Catalog products available:

Deploy the Business-Unit-1 VPC
In this section, we will deploy the “Business-Unit-1” VPC that will act as a new VPC created for a unit within the AWS Organization that will be connected to the centralized hub VPC Client VPN. This will include the following resources:
- VPC named “Business-Unit-1 VPC”
- Two private subnets and a public subnet for a NAT Gateway
- EC2 Instance, with the name “RedHat Bitnami WordPress Site”, located within a private subnet and blocked off from the open internet.
- Route Table named “Business-Unit-1” VPC Private Subnet Route Table”
From your Cloud9 terminal, run the following command:
python3 scripts/deploy_test_vpc.py
Launch the Service Catalog Products
In this section, we will launch the two Service Catalog Products that we created earlier.
From your Cloud9 terminal, run the following Python script:
python3 scripts/launch_test_sc_products.py
The following are screenshots of what has been created and modified:

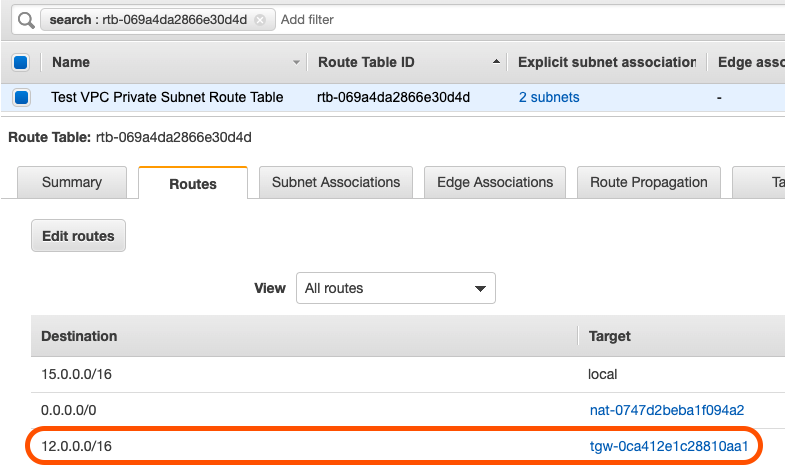
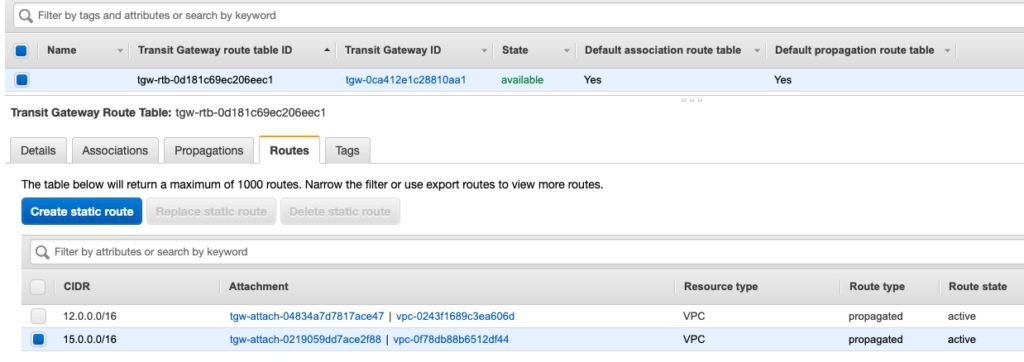
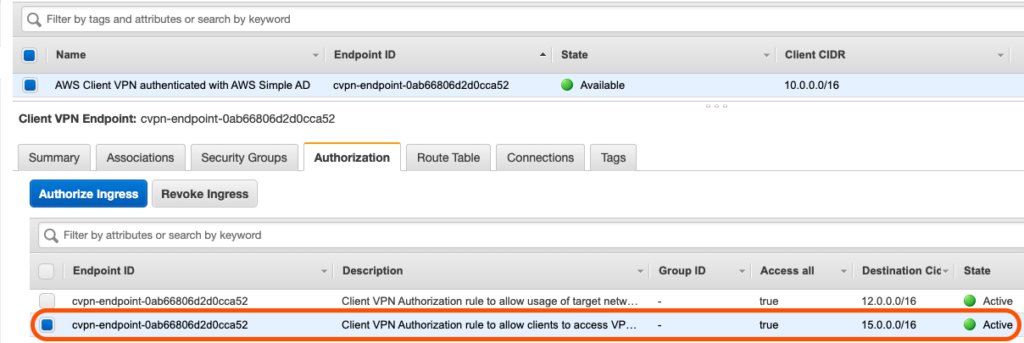
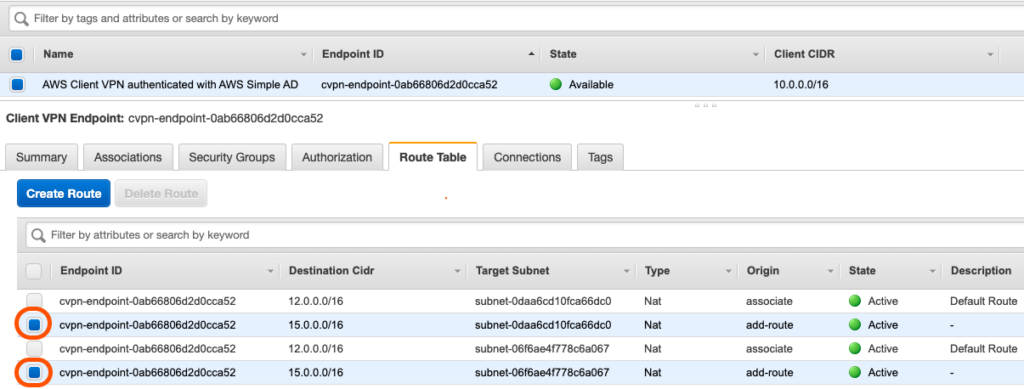
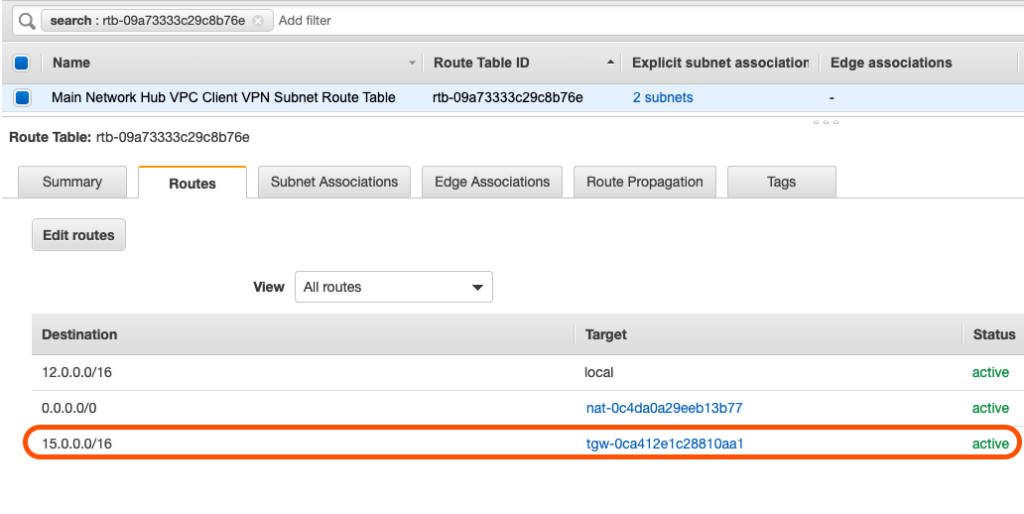
Together, these components will allow traffic from the Client VPN Endpoint to be forwarded through the Main Network VPC Client VPN associated subnets >> Transit Gateway >> “Business-Unit-1” VPC. Below is a diagram that shows the changes, from the Service Catalog Products, that have been made to both the central network hub VPC as well as the “Business-Unit-1” VPC:
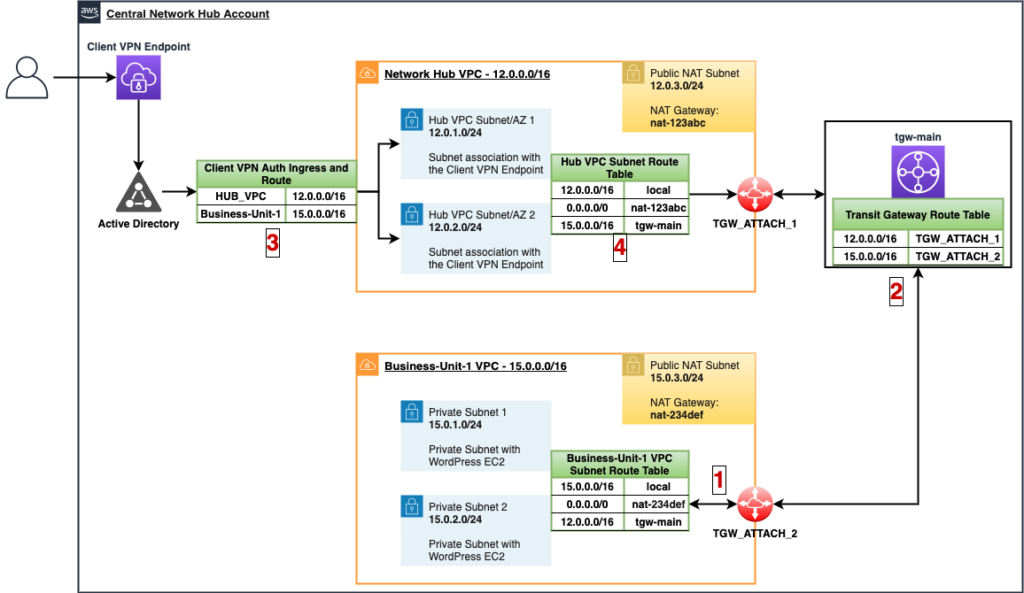
- The Service Catalog Product “AWS Transit Gateway Attachment” created a Transit Gateway Attachment (“TGW_ATTACH_2”) for the “Business-Unit-1” VPC to the “tgw-main” Transit Gateway. It also added a route to the “Business-Unit-1 VPC Subnet Route Table” with a destination CIDR of 12.0.0.0/16 (Network Hub VPC CIDR) with a target of the “tgw-main” Transit Gateway
- A new route was added to the “tgw-main” Transit Gateway Route Table with a destination CIDR of the “Business-Unit-1” VPC (15.0.0.0/16) and a target of the Transit Gateway Attachment “TGW_ATTACH_2”.
- The Service Catalog Product “AWS Client VPN Auth and Route Config” added a new Client VPN Authorization Ingress Rule and Route with a destination CIDR of the “Business-Unit-1” VPC (15.0.0.0/16).
- The “AWS Client VPN Auth and Route Config” Service Catalog Product also added a new route to the network hub “Hub VPC Subnet Route Table” with a destination CIDR of the “Business-Unit-1” VPC (15.0.0.0/16) with a target of the “tgw-main” Transit Gateway.
Testing the VPN Connectivity
In this section, we will test out the Client VPN connectivity by trying to load the RedHat Bitnami WordPress web page being hosted on the EC2 Instance named “RedHat Bitnami WordPress Site”. This EC2 Instance is located inside of one of the private subnets within the Test VPC and is not publicly accessible.
To test out your Client VPN connectivity, navigate to the VPC Console > Client VPN Endpoints and click “Download Client Configuration”. This is the OpenVPN configuration file that will be loaded into Tunnelblick (or your choice of OpenVPN client)

Open the Tunnelblick client and drag-and-drop the downloaded configuration file into the “Configurations” menu. Grab the private IP address of the “RedHat Bitnami WordPress Site” EC2 Instance and paste it into your browser. You should see that you are unable to access the webpage and that the site can’t be reached.
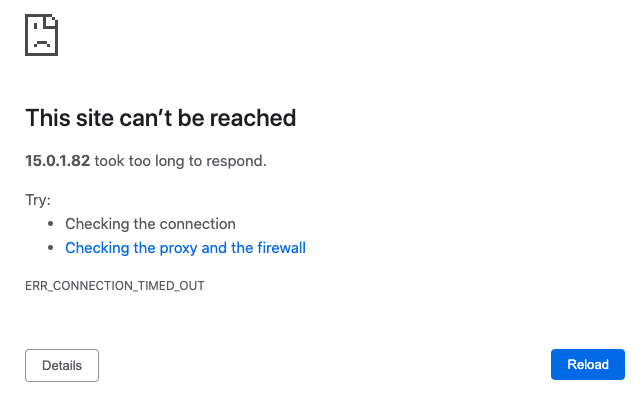
Now back in Tunnelblick, click the “Connect” button (for the downloaded Client VPN configuration) and you will be prompted with entering the following:
- Username – this is Simple Active Directory initial admin username.
- Type “Administrator”
- Password – this the initial password that was set for the admin user.
- Type “Password123!”
You should then see some logs generating and when you have successfully connected, you will see something similar to the following:

Note: When connected to this Client VPN, you will not have normal internet access since we did not create a Client VPN Authorization Rule and Route of “0.0.0.0/0”.
Finally, try to load the “RedHat Bitnami WordPress Site” EC2 Instance private IP address into your browser and you should see the WordPress homepage.
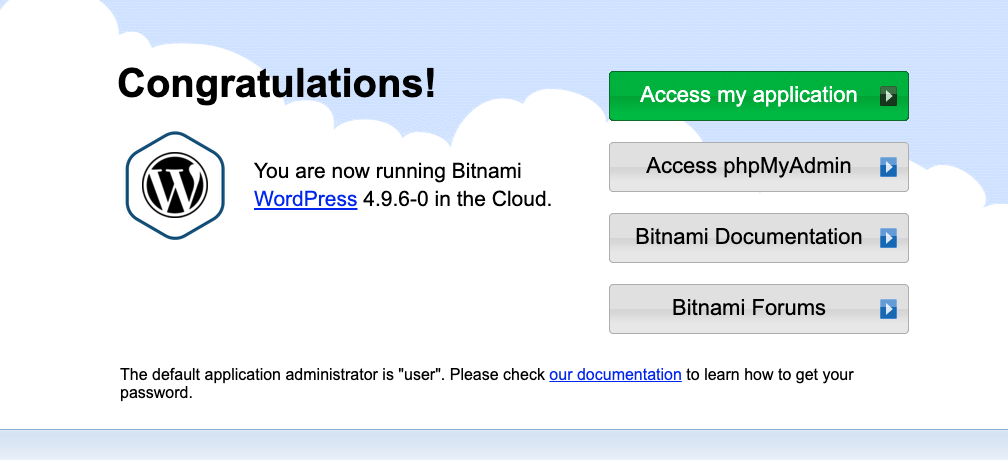
At this point, you have successfully established a VPN connection through a centralized hub network VPC to another VPC through the use of AWS Client VPN and Transit Gateway.
Conclusion
In this post, you learned how to create a centralized hub-and-spoke VPN network strategy. By implementing an automated, secure, and scalable multi-account strategy for remote VPN access, financial services organizations can increase the efficiency and capabilities of their remote workforce.
Consider the use of AWS Client VPN and Transit gateway to help provide remote VPN access into AWS at scale. If you have any questions or would like to take this solution further, contact us today.
All of the source code for this solution is located at: https://github.com/VerticalRelevance/aws-client-vpn-factory.git
