
Photo by @proxyclick from Unsplash
In our previous blog post, Enabling a Financial Services Workforce to Work Remotely we discussed how it can be difficult to set up a remote workforce while still enforcing security and governance.
For financial services organizations, providing workstations that enable Front Office, Middle Office, Back Office, Developers, etc. to access the tools and services they need while still being able to enforce security, traceability and auditability requirements is extremely important. In most organizations, in order to meet these requirements, it often requires a small army of technicians procuring hardware and imaging laptops as part of an onboarding process. This is often riddled with delays and if there’s unexpected volume, it can cripple an organization.
In this blog post, we will go over using Amazon Workspaces to provision end-user workstations for teams in a self-service, near-infinitely scalable, and secure fashion. By the end of this post you will be able to build leverage automation to build a fleet of Amazon Workspaces for a distributed, and remote workforce which can be incorporated into your organization’s onboarding process.
Amazon Workspaces
With workspaces, you can provision desktops in just a few minutes and quickly scale up to provide thousands of desktops to workers across the globe. Amazon workspaces is a managed, secure Desktop-as-a-Service (DaaS) solution for Windows or Linux.
Workspaces are where the development, business, and day to day operations activities are executed. Different tools and programs are installed into a workspace environment that, combined together, allow the employee to build and test software, perform research activities, or complete business activities. Having a way to reliably and securely deploy and maintain these environments provides a consistent mechanism to provide environments on-demand. So, how do you get started? Let’s dive into it.
Setup
Here we will do several setup activities that will be used throughout the rest of the blog post
Cloud9
In this section, you will configure the Cloud9 IDE to run the commands that deploy this secrets management solution.
- Go to the AWS Cloud9 console and select Create Environment
- Enter a Name and Description
- Select Next Step
- Select Create a new instance for environment (EC2)
- Select t2.micro
- Leave the Cost-saving setting at the After 30-minute (default) option enabled
- Select Next Step
- Review best practices and select Create Environment
- Once your Cloud environment has been launched, open a new terminal in Cloud9
In the following sections, you will need to execute commands from this environment.
Clone The Repositories
We need to clone the GitHub repository which has all of our CloudFormation templates that we will use in future steps.
From Cloud9, run the following command:
git clone https://github.com/VerticalRelevance/workspaces-image-factory.git
cd workspaces-image-factory
Creating an IAM user for Selenium
In a later section of this blog post, we utilize Selenium to automate a step in our pipeline where we need to automatically create a Workspace Bundle (we only do this due to an absence of a Workspace API). In order for Selenium to do this, we’ll need to create an IAM user.
First, add the selenium-user-name and selenium-password parameters to Parameter Store. From Cloud9, run the following commands:
aws ssm put-parameter \
--name "/selenium-password" \
--value "P@sSwW)rd" \
--type "SecureString" \
--tier Standard

aws ssm put-parameter \
--name "/selenium-user-name" \
--value "ansible_workspace" \
--type "SecureString" \
--tier Standard
Then launch the CloudFormation Stack. From Cloud9, run the following command:
aws cloudformation deploy \
--template-file workspaces-images-factory/cfn_templates/workspaces_iam_user.yml \
--stack-name workspaces_iam_user
SimpleAD
Launch our SimpleAD directory so we can leverage AD to manage our logins for the Workspace environments we’re going to create. We will do this by launching our SimpleAD cloudformation template that will create:
- A VPC with 2 subnets, an Internet Gateway, and associates the subnets to a route table that has the Internet Gateway attached.
- A security group that allows RDP traffic on ports 5985 and 5986
- Setup SimpleAD and deploy it into the VPC and subnets previously created
From Cloud9, run the following command:
aws cloudformation deploy \
--template-file cfn_templates/simple_ad.yml \
--stack-name vpc-with-ad \
--parameter-overrides \
DomainName=corp.verticalrelevance.com \
SimpleADShortName=corp \
SimpleADPW=Pass@w0rd \
Size=Small
The Parameters
- DomainName: A fully qualified domain name that will be associated with Active Directory (Does not have to resolve to an actual domain)
- SimpleADShortName: NETBIOS name of the Active Directory Domain
- SimpleADPW: The password to assign to the Active Directory Administrator
- Size: The size of the directory
Make a note of the Subnets that were created as part of this stack. You will need them when you register your SimpleAD directory with Amazon Workspaces. To get the Subnets, run the following command from Cloud9:
aws cloudformation describe-stacks \
--stack-name vpc-with-ad \
--query "Stacks[0].Outputs[?OutputKey=='SubnetOneID' || OutputKey=='SubnetTwoID'].OutputValue" \
--output text
Upon completion of the SimpleAD setup, the directory must be registered with Amazon Workspaces:
- Navigate to Workspaces from the AWS Console
- Select Directories in the left-hand menu.
- Select your newly created directory.
- Select Actions and then select Register.
- Select the two subnets you created through the SimpleAD creation process (returned from the AWS CLI command) and then select Register.
- Once the directory is registered, select your directory, select Actions, and select Update Details.
- Expand Security Group and select the workspaces-rdp security group
- Expand Access Control Options and check the boxes for Web Access and Linux.
- Scroll to the bottom and select Update and Exit
Workspace Landing Zones
For this blog post, we will use a single AWS account to reduce the complexity, but we recommend investing in building a multi-account architecture to segregate workloads.
We recommend AWS’s Control Tower service to create and manage the Landing Zones (AWS Accounts). A recommended approach will consist of a production Landing Zone to house all of the production workspaces, a QA Landing Zone to execute our builds and tests, and an operations Landing Zone where we will execute our automated pipelines to orchestrate our Workspace delivery process, and finally the business unit’s Landing Zones.
Account Structure
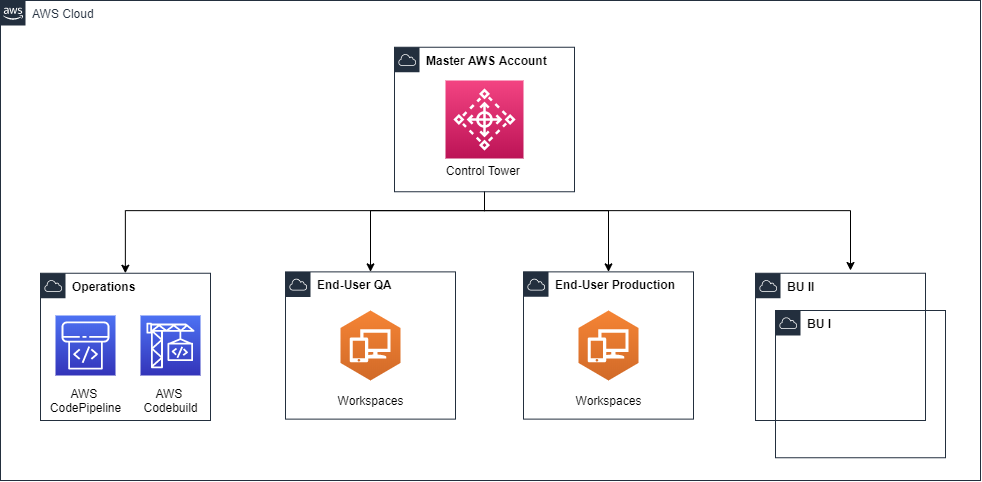
Figure 1 – Account Structure
- End-User QA – Landing Zone used for testing workspace environments.
- End-User Production – Landing Zone used for the production of workspace environments.
- Operations – Landing Zone used to maintain IT tools and services. This is where the pipeline would live and leverage cross-account roles to launch workspace environments, run tests, etc. in the end-user testing and end-user production Landing Zones.
- Business Unit – X number of Landing Zones used by the business unit (we will assume these already exist for this blog)
- The End-User Production Landing Zone will then connect to the business unit’s Landing Zones through VPC peering.
VPC Structure
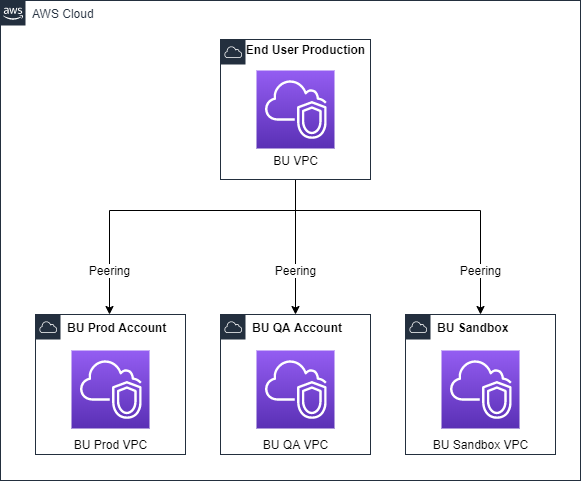
Figure 2 – VPC Structure
This will give you a clear set of boundaries for your business unit’s applications and infrastructure and your End-User Workspaces.
Workspace Base Bundle
Unfortunately, Workspaces requires several manual steps in order to prepare a base image and bundle that’s ready for automation. We’ll need to launch an Amazon Workspace from the default Windows 10 bundle provided by AWS, open up ports for Ansible to connect through, and configure a windows service user. Then we’ll create an Amazon Workspace image (base image) from the configured workspace then create an Amazon Workspace bundle (base bundle) which will be used in the following sections.
Create the Base Image
A base image must be manually created in Workspaces before any automation can actually be applied. This is unfortunately mostly a manual process, but you’ll only need to do this once. You’ll need to launch a workspace with the default Windows 10 bundle provided by AWS.
- Go to the Amazon Workspaces console and select Launch Workspace
- Select the directory that was created through the SimpleAD cloudformation stack and select Next Step
- Create your user for logging into the Workspace and select Create Users and select Next Step
- Select your bundle Standard with Windows 10 and select Next Step
- Leave the Auto-Stop setting option enabled and select Next Step
- Select Launch Workspaces
Once the workspace is running, you will receive an email with a link to download the Amazon Workspaces client and connect to the Workspace. You will be asked to set a password for the ADUser. You will use this password to login to the Workspaces Client.

We need to create a local administrator user named ‘ansible’ so, in future steps, we can have ansible connect to the Workspace and configure it depending on the type of Workspace we want to create.
From the Workspace, run the following in Powershell as an administrator:
$Username = "ansible"
$Password = "P@sSwW)rd"
$url = "https://raw.githubusercontent.com/VerticalRelevance/workspaces-image-factory/master/scripts/Create_administrator.ps1"
$file = "$env:temp\Create_Administrator.ps1"

(New-Object -TypeName System.Net.WebClient).DownloadFile($url, $file)

powershell.exe -ExecutionPolicy ByPass -File $file
From the Workspace, run the following in Powershell as an administrator:
$url = "https://raw.githubusercontent.com/ansible/ansible/devel/examples/scripts/ConfigureRemotingForAnsible.ps1"
$file = "$env:temp\ConfigureRemotingForAnsible.ps1"

(New-Object -TypeName System.Net.WebClient).DownloadFile($url, $file)

powershell.exe -ExecutionPolicy ByPass -File $file
We now have the Workspaces configured so that Ansible can log in and execute automation scripts remotely (from a pipeline).
Store the Ansible Password in SSM
During the base image creation step, you created a local ansible user on your workspace. This user will be used for our Workspaces Pipeline (future step) to use Ansible to login to the Workspace and execute the desired playbooks for configuring the workspace. Since we will be logging in as Ansible through an automated pipeline, we will want to store the password in AWS SSM for the pipeline to retrieve.
From Cloud9, run the following command:
aws ssm put-parameter \
--name "/ansible-winrm-password" \
--value "P@sSwW)rd" \
--type "SecureString" \
--tier Standard
NOTE: This password is hardcoded in the powershell script for creating the local ansible user, so if you wish to use a different password, you will need to modify the password in the powershell script as well
Create the Base Bundle
From the Amazon Workspaces console
- Select on your running workspace
- Select Actions and select Create Image with the properties:
- Image Name: windows-10-base
- Description: Base Windows 10 image with Ansible user
- Select Images on the left toolbar
- Select the image you created, select Actions, and select Create Bundle
- Fill out the information for creating the Bundle with the properties:
- Bundle Name: windows-10-base-bundle
- Description: Windows 10 Base Bundle
- Bundle Type: Value
- Root Volume Size: 80
- User Volume Size: 10
- Select Create Bundle
We now have the base Workspaces bundle from which all future Workspaces can be built from.
Store the BundleID in SSM
During the base bundle creation step, you created a new Workspace bundle. In a future step, we will want to utilize the BundleID, so we will want to store the BundleID in AWS SSM for the pipeline to retrieve.
From Cloud9, run the following command:
aws ssm put-parameter \
--name "/base-bundle-id" \
--value "wsb-21gxtj1x0" \
--type "SecureString" \
--tier Standard
Replace wsb-21gxtj1x0 with the Base BundleID created in the previous step
Store the AD Username in SSM
During the base bundle creation step, you created a new AD User. In a future step, we will want to utilize the AD Username, so we will want to store the username in AWS SSM for the pipeline for retrieval.
From Cloud9, run the following command:
aws ssm put-parameter \
--name "/ad-user" \
--value "brian" \
--type "SecureString" \
--tier Standard
Replace brian with the AD username you created in the previous step
Workspace Automation
In order to get to a fully built workspace, we leverage automation. We automate the configuration of the Workspaces for each of the different types of roles within an organization (Accountant, Trader, Developer, etc.). To do this, we use Ansible. We launch a Workspace from our base bundle, which Ansible will then connect and run a playbook that configures the Workspace accordingly.
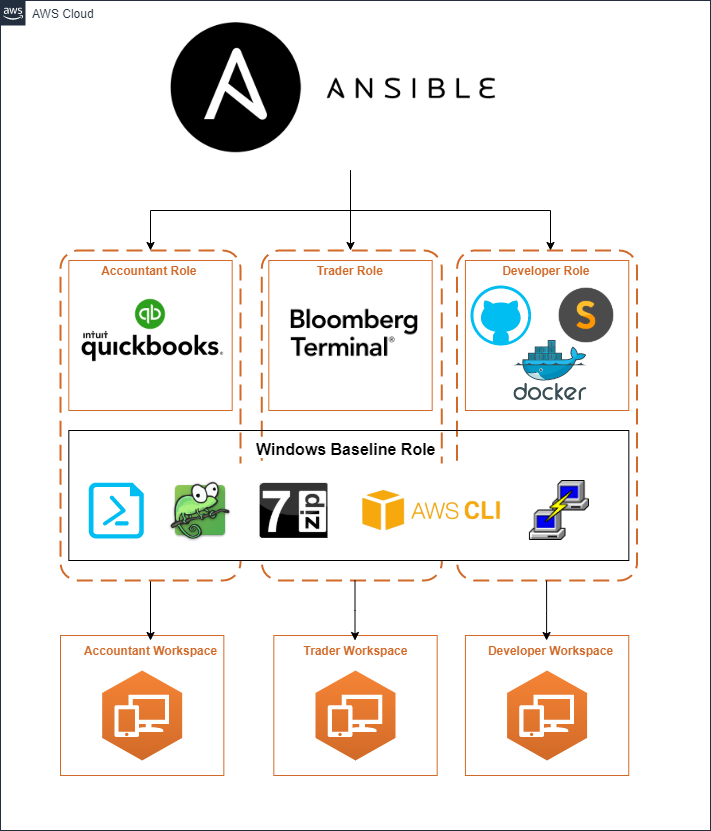
Figure 3 – Workspace Automation
Ansible has two components here:
- Ansible Playbook: Used to define orchestration, the use of Ansible commands, roles, etc. to configure a remote environment.
- Ansible Roles: Used to define the execution of Ansible tasks, vars, files, etc. with the goal of building a target state.
For the roles, we have architected them in two different manners. First we have a horizontal role that installs and configures all of the basics for windows. Next we have roles that are built specifically for installing and configuring resources that align with a particular employee type.
Windows Baseline Role
- Apps: AWS Tools for Windows Powershell, AWS CLI, Notepad++, 7Zip, LogParser, Putty
- Specific Configuration: Update Powershell to the latest version, Create task in task scheduler that pins applications to the taskbar upon user sign-on
Accountant role
- Apps: Quickbooks
- Configuration: None
Trader role
- Apps: Bloomberg Terminal
- Configuration: None
Developer role
- Apps: Docker, Sublime Text Editor, Git
- Configuration: Set system Python/Java/Ruby version and install package managers
To prevent code and effort duplication, we put applications and settings that should be applied across all Windows images into our Windows Baseline Role which gets applied to all Workspaces. Then we apply both our Windows Baseline role and the job-specific role (Accountant, Trader, Developer) to our Workspaces to build out a complete environment.
Test the Workspace
Upon completion of the Ansible playbook successfully running, tests are executed to ensure that the Workspace image is configured as expected. Tests include ensuring that specific applications are installed and at the correct version as well as checking that certain system and user settings are properly configured.
Workspace Catalog
AWS Service Catalog is a core service for us at Vertical Relevance. It provides a mechanism for enabling users to request and deploy resources through self-service while also incorporating governance. To provide Workspace environments to the end-user, the completed role-specific Workspaces bundles are added to Service Catalog as Products in a Workspaces Portfolio.
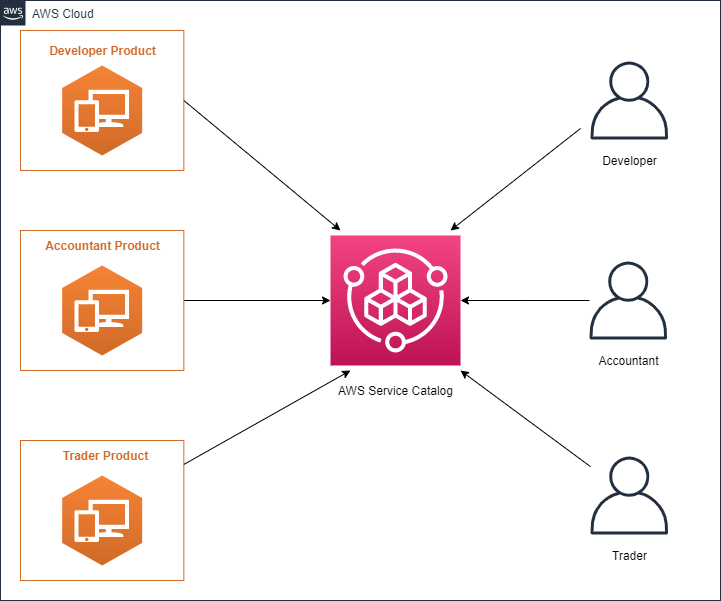
Figure 4 – Workspace Catalog
In order to get started with Service Catalog, we will need to set up the Service Catalog Portfolio along with some baseline Products and IAM roles and permissions in order to properly interact with Service Catalog.
Set Up Service Catalog
Create an S3 bucket that will hold Cloudformation templates needed for the Service Catalog Portfolio setup. This bucket will be used to upload Service Catalog Product templates for newly created Workspaces bundles.
From Cloud9, run the following command:
aws s3api create-bucket \
--bucket my-bucket \
--region us-east

aws s3 cp cfn_templates/service-catalog s3://my-bucket --exclude "*" --include "*.json" --include "*.yml" --recursive
Replace my-bucket with a unique s3 bucket name
Launch the Portfolio
From Cloud9, run the following command:
aws cloudformation deploy \
--capabilities CAPABILITY_NAMED_IAM \
--template-file cfn_templates/service-catalog/sc-portfolio-workspaces.json \
--stack-name service-catalog-workspaces-portfolio \
--parameter-overrides RepoRootURL="https://s3.amazonaws.com/my-bucket/”
This will create a Service Catalog Portfolio named “Service Catalog – AWS Workspaces” with 3 Products inside of it:
- AWS Workspaces application for Accountant
- AWS Workspaces application for Developer
- AWS Workspaces application for Trader
After the pipeline executes, the three Workspace products will be updated and available for consumption.
Workspace Pipelines
Now to tie it all together, automation should be used in the launching of subsequent Workspaces, installation and configuration, and the testing of the environment. Codepipeline can orchestrate the steps necessary to create role-specific Workspaces bundles.
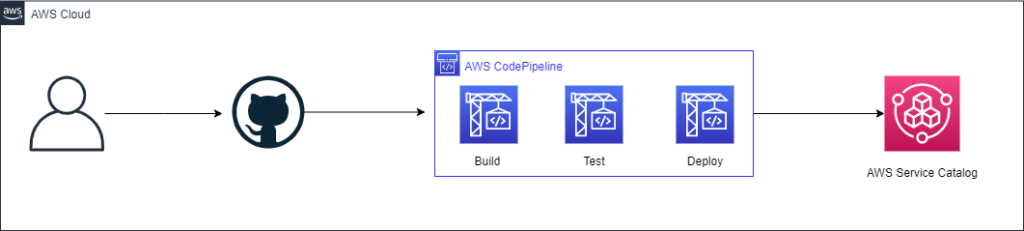
Figure 5 – Workspace Pipeline
Launch the Workspace pipeline using the pipeline.yml CloudFormation template. This will launch a Codepipeline pipeline that will be used to orchestrate the build, test, and deployment of our Workspaces.
From Cloud9, run the following command:
aws cloudformation deploy \
--capabilities CAPABILITY_NAMED_IAM \
--template-file cfn_templates/pipeline.yml \
--stack-name workspaces-image-pipeline \
--parameter-overrides \
RepoOwner=VerticalRelevance \
RepoName=workspaces-image-factory \
BranchName=master \
GitHubToken=12345ddfa2
Replace 12345ddfa2 with your github personal access token.
The Parameters:
- RepoOwner: This is the name of the Github organization that the codebase is associated with
- RepoName: This is the name of the GitHub repository that the pipeline will checkout it’s codebase from
- BranchName: This is the Git branch the pipeline will checkout the codebase from
- GithubToken: This is your Github personal access token so the pipeline can pull the code from GitHub
Once we have our pipeline running, it will start to execute to build out Workspace bundles. Here’s what the pipeline will do:
Automated Build of the Workspace
Once the Workspace is up and running, Codebuild retrieves the details about the Workspace and configures it. First CodeBuild executes a script that locates the Workspace ID and sets the Running Mode to AutoStop.
Then Ansible, Boto3, and PyWinrm are installed on CodeBuild so it can remotely configure the running Workspace. Ansible runs a playbook to ping the Workspace to confirm that a connection can be made (Due to the non-static nature of the IP address that is assigned to the Workspace, a script that can dynamically generate an inventory file is passed to the playbook command)
Ansible will execute the main playbook.yml. This playbook will set-up Active Directory, install and configure the packages and configuration of the Workspace.
Automated Testing of the Workspace
Automated tests will execute to ensure the Workspace was configured as expected.
Automated Deployment of the Workspace to Service Catalog
Now, for the ugly part. We’re going to prefix this section with a disclaimer that we generally would not recommend using Selenium (or any other CSS tag based automation tool) to automate steps of a process in a pipeline, but in the spirit of complete automation and since no API exists for creating a Workspace image, we had to get creative.
A Selenium script is executed that automates the Bundle creation
After the new bundle(s) have been created, a parallel set of CodePipeline jobs tear down the Workspaces CloudFormation stack that was created in the initial stage.
Lastly, the pipeline will publish the new bundle to Service Catalog for consumption.
At this point, you’ll have your Developer, Accountant, and Trader AWS Workspace Service Catalog products available for consumption by your teams!
Conclusion
In conclusion, financial services organizations can use Amazon Workspaces in combination with automation tools to build out a configurable and scalable mechanism for providing workstations to their Front Office, Middle Office, Back Office teams. These workstations can be built with an organization’s security and compliance controls, along with anything else that is viewed as necessary to manage risk in the organization.
Consider Amazon Workspaces if you need to scale rapidly, need to enforce security and compliance controls, need to enforce audit and traceability on your workstations, or are looking for incorporating automation into your onboarding and offboarding processes. If you have any questions or would like to take this solution further, contact us today.
Stay tuned for our next blog as we dive deep into Amazon Connect, learn how you can build a call center that is fully-integrated, automation focused, and is a platform that adheres to regulatory and compliance standards.
Missed the first blog in this series? Be sure to check out, Enabling a Financial Services Workforce to Work Remotely so you can get started in building a remote environment at scale