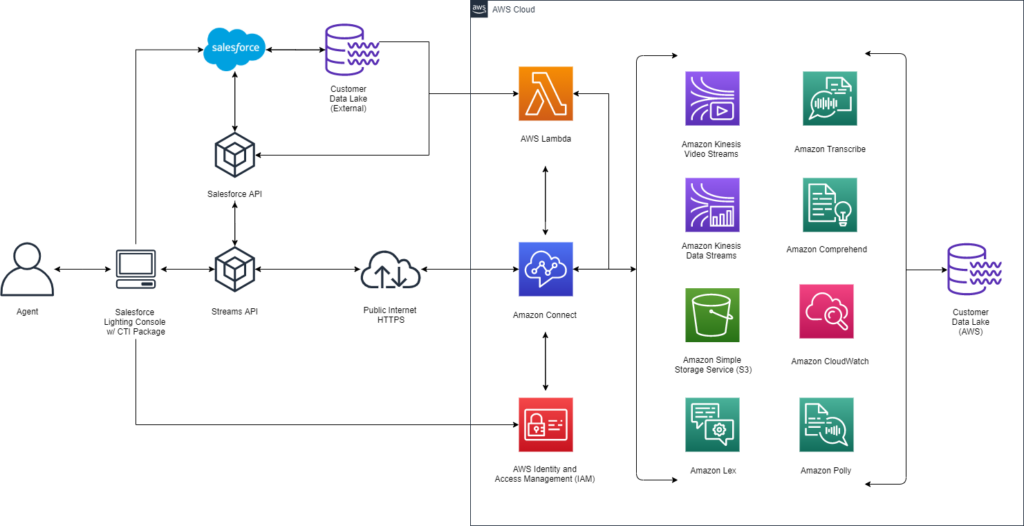
In this post, we’ll illustrate the business benefits that a financial services organization can achieve by creating a connected call center experience leveraging Amazon Connect and Salesforce Service Cloud. To accomplish this we’ll walk you through the setup of key components of the solution including Salesforce Service Cloud Computer Telephony Integration (CTI), Amazon Connect, Amazon Lex bots, and AWS Lambda to interface data from Connect to Salesforce.
Amazon Connect is AWS’s omnichannel cloud contact center that can seamlessly be integrated with Salesforce. Amazon Connect allows users to make and receive calls directly within Salesforce, integrated with the Salesforce CRM experience, enabling automation, call recording, and sentiment analysis available all directly within Salesforce. With Connect, users can initiate, track, and manage customer interactions via phone all within the Salesforce platform. Leveraging Salesforce Omnichannel, users can further bring all channel interactions (phone, email, chat, text) into a centralized location on the Salesforce platform to efficiently track, log, and manage customer interactions.
Background
When it comes to customer support, the voice channel is the most expensive channel for an organization to support. Therefore, most companies will utilize call deflection strategies to funnel inquiries to lower-cost channels such as self-service or chat. However, in financial service institutions, this is often not possible due to the complexity of customer inquiries related to financial products and services. Customers want a seamless, personal, connected experience where they can quickly reach a representative who has full visibility, history, and background on their account and previous interactions and who can provide solutions to their inquiries on a first call basis. Financial service firms want a secure, scalable, flexible platform that allows them to quickly change and adapt to their customer needs without IT bottlenecks slowing them down.
The following table describes the set of problems companies often face:
| Problem | Details |
| Poor customer experience navigating IVR menus | Legacy IVRs are fixed, don’t automatically recognize customers, are difficult to navigate, and leave the customer feeling frustrated, stuck in a loop, and slighted. |
| Expensive, inflexible, on-premise telephony system | On-premise telephony systems are expensive, difficult to manage, and difficult to upgrade. As cloud systems like Amazon Connect are constantly upgraded with the latest technology, these inflexible legacy systems can be sunset. |
| Representatives must swivel chair to multiple systems | Legacy telephony system information often exists outside the users’ CRM, leading to a difficult, inefficient process that can involve switching browser windows/apps and dealing with extensive manual data entry. |
| Incomplete or missing customer history in CRM | Legacy systems don’t provide insight into past customer interactions. Incoming calls can leave reps frantically typing customer IDs into the CRM to pull up past customer information, and often not finding the information that they need. |
| Lack of insights and analytics for calls | Every call with the customer is an opportunity to gain a deeper understanding of their current sentiment, their overall satisfaction, and any problems or issues that might turn into potential revenue. Improper call analysis leaves these insights unexplored and leads to subpar customer retention rates and lost upsell opportunities. |
| Higher costs due to high average handle times (AHT) | AHT is a key factor in determining service center staffing needs. The problems above compound into longer, disorganized calls which lead to higher average handle times and, as a consequence, higher costs. |
| Static call routing configuration | With legacy telephony systems, not only are IVRs and call routings static, they are difficult to change and can often leave the customer frustrated. |
Solution
The table below provides the solution and business benefits you can realize by utilizing the AWS and Salesforce services listed:
| Problem | Solution | AWS & Salesforce Services |
| Poor customer experience navigating IVR menus | AWS Contact Flows allow you to have granular control over the entire customer service experience from connection through termination. Contact Flows are quickly modifiable, and with the inclusion of Lex Bots, provide a conversational IVR solution that is easy to use and provides an excellent overall customer experience. | Connect Contact Flows, Amazon Lex Bots, Routing Profiles, Queues |
| Expensive, inflexible, on-premise telephony system | Amazon Connect is a cloud-based, scalable, pay-as-you-go solution, and allows you to quickly adapt to changing business needs as compared to a traditional legacy call center system. | Amazon Connect, Salesforce CTI |
| Representatives must swivel chair to multiple systems | Amazon Connect is seamlessly integrated into Salesforce and works with Service Cloud and Omnichannel to provide a smooth, connected CTI experience. | Salesforce Service Cloud, Salesforce Omni-Channel, Salesforce CTI |
| Incomplete or missing customer history in CRM | Call records, such as case, task, or other custom records can be created and stored directly within Salesforce to automatically document and capture information about all inbound and outbound calls, providing a complete 360-degree view of the customer. | Salesforce Service Console, Amazon Connect Transcriptions + Call Recordings + Sentiment Analysis logged in Salesforce |
| Lack of insights and analytics for calls & workforce metrics | Amazon Connect allows you to extract as much as possible from your calls, providing detailed call center metrics, as well as call recordings, transcriptions, sentiment analysis, and keyword analysis available directly within Salesforce. | Amazon Connect Transcriptions + Call Recordings + Sentiment Analysis logged in Salesforce, Omni-Channel Supervisor |
| Higher costs due to high average handle times | Salesforce screenpop functionality allows you to view full customer case history and information during incoming calls, allowing for full visibility into the customer. Salesforce Knowledge articles provide quick suggested solutions to common customer issues. | Amazon Connect Transcriptions + Call Recordings + Sentiment Analysis logged in Salesforce + Salesforce Knowledge |
| Static call routing configuration | Rather than static rules and criteria, the dynamic call routing available using Connect Contact Flows and Amazon Lex Bots allows users to speak to the IVR and be routed to the appropriate queue. E.g. Calls can dynamically route to a high touch, senior specialist queue based on a negative sentiment score from the previous call. | Connect Contact Flows, Amazon Lex Bots, Routing Profiles, Queues, Salesforce Omni-Channel |
Implementation
Let’s walk through the specific example discussed above on how an enterprise would go about creating an Amazon Connect and Salesforce Service Cloud call center.
Setup Overview
- A custom IVR setup using the Call Path feature on Amazon Connect routes calls based on skill and availability.
- The inbound call pops up on the Salesforce Utility Bar. If the Advisor accepts the call, and there is a match to an existing record, the system screen pops the matching contact record so that the agent has easy access to relevant information.
- As the representative speaks to the customer, they can see information on the contact about the customer, key insights into past interactions, and any other relevant information.
- Meanwhile, Connect automatically creates a Task in the background storing information about the call. Connect also creates a “Contact Channel Analytics” record after the call is completed which stores key information about the call, including a call recording, a call transcript, keywords from the call, and sentiment analysis performed using AWS ML capabilities.
- The sentiment score is recorded from a scale of -5 to +5 and can be used to quickly determine the customer’s satisfaction with the call. The sentiment score can be rolled up to the Task and displayed on the Contact as well.
- Tracking the Last Sentiment Score and the Average Sentiment Score enables you to understand the customer’s overall satisfaction levels, discover trends, and take appropriate action to either rectify a poor sentiment score or capitalize on an excellent sentiment score. For example, customers with a lower sentiment score can be routed into a higher priority queue to customer service agents who specialize in providing excellent service or dealing with difficult customers.
- The two primary components are the CTI Adapter Managed Package available from the AppExchange Marketplace, and the AWS Serverless application package available from AWS. The below configuration guidelines outline the basic setup required to install the CTI Adapter Managed Package to enable basic Connect functionality:
Prerequisites
Salesforce
- Org needs to be on Lightning Experience
- MyDomain needs to be configured and deployed – https://help.salesforce.com/articleView?id=domain_name_overview.htm&type=5
- API User Provisioned
- Create a new connected app for AWS Connect
Browser
- Latest Version of Mozilla Firefox or Google Chrome
Salesforce Installation
- Install the Managed Salesforce Package from the AppExchange Marketplace – https://appexchange.salesforce.com/listingDetail?listingId=a0N3A00000EJH4yUAH
- This managed package provided by Amazon Web Services in conjunction with Salesforce establishes the core CTI Integration between AWS and Salesforce.
- Validate by checking that the Amazon Connect – Universal Package is installed under “Installed Packages” in Setup
- Assign Permission Sets to user as necessary
1. AC_Administator for Admins
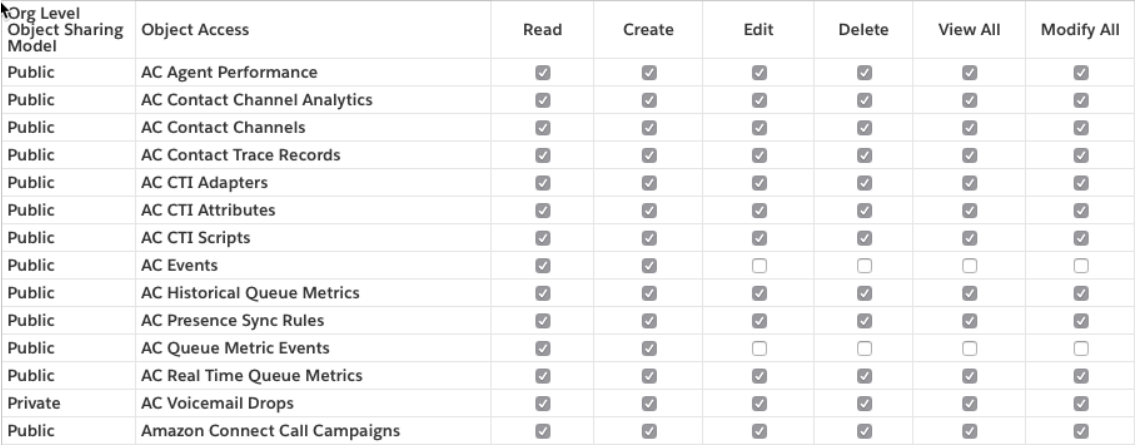
Figure – 04
2. AC_Agent for Users

Figure – 05
3. AC_Manager for Call Center and Team Managers

Figure – 06
Amazon Connect Setup
Initial Setup
- Create an AWS Account (if necessary) at https://aws.amazon.com/
- Sign in to the console as the Root User (email & password you signed up with)
- Select US East (N. Virginia) from the Region dropdown
- Enter “Amazon Connect” in the Services search bar and navigate to Amazon Connect
- Click “Get Started” -> Click “Add an Instance”
- Select “Store Users within Amazon Connect”
- Enter a new unique value as your access url. Save this value for later reference
- “Next Step” -> “Add a new admin” -> Create a new admin account
- “Next Step” -> Select both incoming and outbound calls
- “Next Step”
- “Next Step”
- Review the information and then click “Create Instance”
- Click “Get Started”
- Click “Let’s Go”
- Select a phone number. Make sure that type is set to “Direct Dial”
- Click “Next” – Allow browser microphone access if needed
- Your instance is ready to use!
Create an Agent Profile
- Click
on the left and select “User Management”
- Click “Add new users” and ensure “Create and set up a new user” is selected
- Create a new agent login and password
- For Routing Profile, Select Basic Routing Profile. For Security Profile, select Agent. For Phone, select Softphone.
- Click “Save” and “Create Users”
Salesforce Customization/Setup
Add the AWS Softphone to the Service Console
- App Manager -> Service Console -> Utility Items -> Add Utility Item -> Add Open CTI Softphone and click “Save”
Whitelist Salesforce Org (Connecting Connect and Salesforce)
- Copy the Salesforce instance root URL
- Go to Setup -> Visualforce Pages -> AC_LightningAdapter -> Preview
- Copy this URL
- Log in to AWS Instance https://console.aws.amazon.com/
- Go to Amazon Connect Console https://console.aws.amazon.com/connect/home
- Ensure you are in the correct region and then open up your instance
- Select “Application Integration”
- Select + Add origin
- Enter the two copied URLs from the beginning through “.com” into the origin URL field
- Once you add both URLs you should see them in the “Approved Origins” section
Update the Call Center Layout
- Go to Setup -> Call Centers -> AC Lightning Adapter
- Replace the CTI Adapter URL with the Visualforce page FULL URL from above
- Change the height to 570 and width to 330
- Save
- Use the “Manage Call Center Users” selection and “Add More Users” selection on the subsequent page to add your users
Toolkit
- Setup -> Custom Settings -> Click “Manage” next to “Toolkit for Amazon Connect” custom setting
- Select “New”
- Enter the URL to the Amazon Connect instance in this form and save: https://your-instancealias.awsapps.com
Softphone
- Setup -> Softphone Layouts -> New
- Enter a name for the new Softphone layout and check the “Is Default Layout” checkbox
- Under “Display these salesforce.com objects,” select the objects that you might want to screenpop
- Configure the screenpop settings to match your requirements and save the page
CTI Adapter Console App
- Service Console -> Navigation Menu -> Edit (at bottom of navigation menu) -> Add More Items -> Add “AC CTI Adapters”
- Navigate to AC CTI Adapters.
- You should see an “ACLightningAdapter” record entry. If you don’t see this record, create it with name “ACLightningAdapter,” enter the alias of your Amazon Connect Instance, and enter the Amazon Connect Instance Region. Leave all other settings as is and save.
- Check that the ACLightningAdapter has the appropriate CTI Scripts:
- “Default Voice Contact onConnecting” – Inbound screen pop
- “Default Salesforce UI onClickToDial” – Click-to-Dial functionality
- “Default Queue Callback Contact onConnecting” – Screen pop for queued callback
- “Default Chat Contact onConnecting” – Chat functionality
- If the above scripts don’t exist, create the scripts in accordance with this Trailhead page: https://trailhead.salesforce.com/content/learn/projects/build-an-amazon-connect-integration/configure-a-salesforce-call-center
- Navigate back to the Service Console home and refresh the page.
Login
- Click on the Softphone in the Salesforce Utility bar and click “Sign in to CCP” and enter your Amazon Connect login credentials. You might be required to allow microphone access by your browser if you haven’t done so previously.
AWS Advanced Setup: AWS Serverless Application Repository
- The Serverless Repo provides the ability to leverage AWS advanced analysis and automation tools to improve the call center experience.
- Also requires a configured Kinesis Stream
- In order to utilize the full functionality and create cases, tasks, and other records, the Connect Instance must have the Amazon Connect Salesforce Lambda package installed.
- The Lambda package augments the basic integration by providing functionality for record creation, record lookup, record update, data imports, recording imports, and analytics imports.
- The Lambda package is key to providing many of the capabilities that make Amazon Connect unique and powerful.
- Whereas this solution typically involves extensive configuration and coding of a Lambda function, the Amazon Connect Salesforce Lambda package can be installed for free from the AWS Serverless Application Repository. Access and installation is free, and you will only be charged for the resources that you utilize.
- Follow the standard installation instructions in the “Amazon Connect CTI Adapter for Salesforce Lightning Setup and Installation Guide” to set up the Amazon Connect Salesforce Lambda package

Figure – 07
Salesforce Advanced Setup: CTI Scripts
Advanced Salesforce functionality can be integrated with the call center using CTI Scripts. Different CTI scripts serve different functions and are triggered at different times, and can be very useful in customizing the appropriate action for various call center needs. CTI Scripts and custom call flows can be used to enhance the standard Connect experience to create custom records, screenpop records, and perform data operations in Salesforce. You can find several examples of CTI Scripts below to enable this advanced functionality.
To enable default click-to-dial functionality, create a CTI Script for the
ACLightningAdapter:
Source: Salesforce UI
Event: onClickToDial
try {
  // Set the country code
  let countryCode = 'US';
  // Format the contact phone number in E164 format
  let e164Number = ac.Utils.Common.formatPhoneNumberE164(payload.number, countryCode);
  // Dial the E164 formatted phone number
  await ac.Utils.Agent.dialNumber(e164Number);
}
  catch (err) {
  // Log the error if one is thrown
  ac.Utils.Log.error(err);
}
To create and screenpop a Task on inbound calls, create a CTI Script for the ACLightningAdapter:
Source: Amazon Connect Voice Contact
Event: onConnecting
// Get the contact type (inbound, outbound, callback)
let contactType = await ac.Utils.Contact.getContactType(contact);
// Get the queue name
let queueName = ac.Utils.Contact.getQueue(contact).name;
// Save the task while saving the return value
let taskResult = await ac.Utils.Salesforce.saveLog('Task', null,
{
CallObject: contact.getContactId(),
CallType: 'Inbound',
Type: 'Call',
IsClosed: false,
Status: 'In Progress',
Subject: contactType + ' - ' + queueName,
TaskSubtype: 'Call'
});

// If task creation was successful, pop the task
if (taskResult && taskResult.recordId)
{ taskId = taskResult.recordId; ac.Utils.Salesforce.screenPopObject(taskId);
 }
Here’s another example of how to handle inbound calls using a customized CTI script for the ACLightningAdapter:
Source: Amazon Connect Voice Contact
Event: onConnecting
// Get the contact type (inbound, outbound, callback)
let contactType = await
ac.Utils.Contact.getContactType(contact);
// Get the queue name
let queueName = ac.Utils.Contact.getQueue(contact).name;
// Get the phone number
let phoneNumber = ac.Utils.Agent.getAgentDeskphoneNumber();
// Get the contact record ID of the caller
let contactRecordId = ac.Utils.Contact.getAttributeValue(contact, 'acsf-screenpop-record');
// This if statement checks the contact type
// This is a great way to split Inbound calls, outbound calls, and callbacks to perform different actions based on the type of call
// Inbound calls would typically have a case created to represent the customer’s issue and a task created to represent the actual call
if(contactType == 'Inbound')
{

// Save the task while saving the return value
let caseResult = await ac.Utils.Salesforce.saveLog('Case', null,
{
// Set the Contact ID
amazonconnect__AC_Contact_Id__c: contact.getContactId(),
 //CallType: 'Inbound',
 //Type: 'Call',
 Type: 'Inbound Call',
 //IsClosed: false,
 Status: 'New',
// Set the subject of the case using the queue value provided by the customer to the IVR that routes the call to the appropriate queue
 Subject: contactType +  ' - ' + queueName,
 //TaskSubtype: 'Call'
 ContactId : contactRecordId
});
// Save the task while saving the return value
let taskResult = await ac.Utils.Salesforce.saveLog('Task', null,
{
// Set the contact id
CallObject: contact.getContactId(),
// Specify the call type
CallType: 'Inbound',
 Type: 'Call',
// Set the status of the task
IsClosed: false,
 Status: 'In Progress',
//Set the subject of the task using the queue value provided by the customer to the IVR that routes the call to the appropriate queue
Subject: 'Call - ' + queueName,
 TaskSubtype: 'Call',
// Connect the task to the case
WhatId: caseResult.recordId
});

// If case creation was successful, pop the task
if (caseResult && caseResult.recordId) {
 caseId = caseResult.recordId;
 ac.Utils.Salesforce.screenPopObject(caseId);
}
}
Conclusion
In this blog post, we discussed the basic configuration and business benefits of setting up Amazon Connect & Salesforce for Financial Services. Amazon Connect brings a unique cloud solution that seamlessly integrates with Salesforce and allows users to not only make and receive calls within Salesforce but also, with some advanced configuration, bring analytics about those calls into Salesforce, including features like call transcripts, call recordings, extracted keywords, and sentiment analysis. All these features enable a seamless, more efficient call center experience, giving users a deeper degree of understanding of their customers and as a consequence allowing them to maximize their insights and bring down their average handle times. If you’re looking to implement Amazon Connect with your Salesforce Instance for a better call center solution, contact us today.
All of the source code from Jeff and Venkat to this solution is located at https://github.com/VerticalRelevance/amazon-connect-for-salesforce.